Octoeverywhere on Android
While many new 3D printers are running klipper, some of the mainstream printers use proprietary firmwares (Bambu, Prusa, Elegoo).
These printers requires a companion/connecter to use octoeverywhere. On the official website, the setup instructions are for Raspberry pi, Windows app or Docker. Since the docker setup supports Linux, there's no reason why the scripts cannot run on Android in Termux.
Even android phones that are several years old are quite capable, not to mention built in battery (but android's usually don't auto boot on power, unlike a SBC)
Warning
While the steps to hosting the connectors on android are quite straight forward, it's also quite involved, if you're not comfortable working in a CLI enviroment like termux/nano, it's probably better not to proceed.
Instaling Termux
Termux is a terminal that emulates a linux enviroment on android. There's 2 places where you can install it:
- Github: https://github.com/termux/termux-app/releases/latest
- F-Droid: https://f-droid.org/en/packages/com.termux/
I opted for github, since I'm more familar with it. Open the link on the android device and download and install the apk.
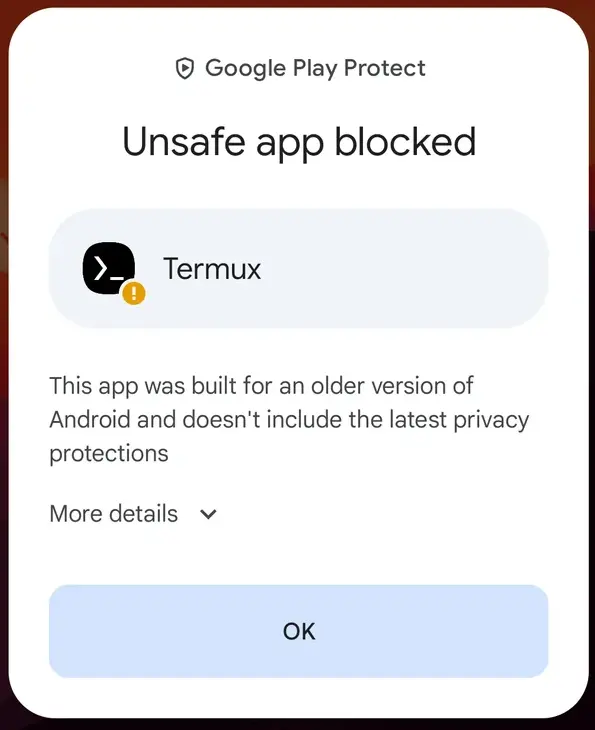
On some android version, it'll need you to enable installing from unknown sources, just follow the screen prompt. During installation Play Protect might block it. Simply press More details -> Install anyways
Using Termux
First thing first, update everything and install what's needed
at any point of these update/install, if termux ask any questions, just use the default option by pressing Enter
Warning
If you see a message about updating pip at any point, DON'T update it
Before you proceed, it'll be a lot easier if you set up SSH access
Creating the enviroment for Octoeverywhere
Create folders to contain the OE installation
mkdir -p "$HOME/octoeverywhere-android/config"
mkdir -p "$HOME/octoeverywhere-android/data"

git clone https://github.com/QuinnDamerell/OctoPrint-OctoEverywhere.git "$HOME/octoeverywhere-android/src"
Create the virtual environment
python -m venv --system-site-packages "$HOME/octoeverywhere-android/venv"

source "$HOME/octoeverywhere-android/venv/bin/activate"

python -m pip install -r "$HOME/octoeverywhere-android/src/requirements.txt"
Adjusting for Android
In the docker configuration, everything runs under docker, so it runs as a subprocess, but on android this isn't needed, everything can run as it's own instance.
Use ctrl+f to search for the line that say result:subprocess.CompletedProcess = subprocess.run([pythonPath, "-m", pyPackage, base64EncodedLaunchConfig], check=False)
you don't need to type out the whole line, just result:subprocess is enough
Replace that whole line with:
This adjustment needs to be commited locally so we can update OE in the future via pull
cd "$HOME/octoeverywhere-android/src"
git config user.name "Termux"
git config user.email "termux@localhost"
git add docker_octoeverywhere/__main__.py
git commit -m "Keep Termux execv launcher"
for name, email and commit message, you can change them as you like
Create a common launcher
Create a new file:
the script that goes inside:#!/data/data/com.termux/files/usr/bin/bash
set -euo pipefail
instance="${1:?Missing connector instance name}"
base="$HOME/octoeverywhere-android"
environment_file="$base/config/$instance.env"
if [[ ! -f "$environment_file" ]]; then
echo "Configuration not found: $environment_file" >&2
exit 1
fi
set -a
source "$environment_file"
set +a
export VENV_DIR="$base/venv"
export REPO_DIR="$base/src"
export DATA_DIR="$base/data/$instance"
mkdir -p "$DATA_DIR"
cd "$REPO_DIR"
exec "$VENV_DIR/bin/python3" -m docker_octoeverywhere
ctrl+o to save Enter to confrim, ctrl+x to exit nano
Make the file executable:
Enviroment files
Each printer will need it's own .env file.
Bambu Printers
On the printer, find the IP address, access code, and printer serial number. Use these 3 values to create a .env file. (assuming you're on LAN+dev mode)
Note
if you need to add multiple printers, name or serialize the env file, ie: p1s-1.env, p1s-2.env or p1s-office.env, p1s-garage.env
the file name can be anything, as long as you can identify it
Fill in the respective values
COMPANION_MODE=bambu
CONNECTION_MODE=local

PRINTER_IP=192.168.0.100
SERIAL_NUMBER=01P09C471100000
ACCESS_CODE=12345678

MQTT_RELAY_ENABLED=false
save and exit
ctrl+o, Enter, ctrl+x
creating .env file for multiple printers of the same brand
Prusa Printers
OE connects to local PrusaLink web interface. Use the printer’s LAN IP and either:
- A PrusaLink API key, or
- A PrusaLink username and password.
Note
if you need to add multiple printers, name or serialize the env file, ie: one-1.env, one-2.env or one-office.env, one-garage.env
the file name can be anything, as long as you can identify it
COMPANION_MODE=prusalink
PRINTER_IP=192.168.0.100
PORT=80

# If you're using API key
API_KEY='YOUR_PRUSALINK_API_KEY'

# If you're using Username and Password
USERNAME='maker'
PASSWORD='YOUR_PRUSALINK_PASSWORD'
don't put both API and user/pass in the env file, choose one.
if you have a static IP set for your machine, the env file shouldn't need editing in the future, in which case you can protect the env file
Elegoo Centauri Carbon Series
You only need to know the IP address
Note
if you need to add multiple printers, name or serialize the env file, ie: cc-1.env, cc-2.env or cc-office.env, cc-garage.env
the file name can be anything, as long as you can identify it
COMPANION_MODE=elegoo
PRINTER_IP=192.168.0.100
MQTT_RELAY_ENABLED=false

# Info below only required if using mode elegoo_cc2
ACCESS_CODE=123456
SERIAL_NUMBER=YOUR_CC2_SERIAL_NUMBER
Note
use 123456 for access code unless access-code protection is enabled on CC2
Serial number does not need to be filled out, as OE will auto-detect
save and exit
ctrl+o, Enter, ctrl+x
creating .env file for multiple printers of the same brand
if you have a static IP set for your machine, the env file shouldn't need editing in the future, in which case you can protect the env file
Klipper
Technically klipper machines can host OE themselves, but if you want a unified location, you can also host it on Android together with the other machines.
Note
if you need to add multiple printers, name or serialize the env file, ie: klip-1.env, klip-2.env or klip-office.env, klip-garage.env
the file name can be anything, as long as you can identify it
COMPANION_MODE=klipper

PRINTER_IP=192.168.1.100
MOONRAKER_PORT=7125
WEBSERVER_PORT=80

# if required
MOONRAKER_API_KEY='YOUR_API_KEY'
save and exit
ctrl+o, Enter, ctrl+x
creating .env file for multiple printers of the same brand
if you have a static IP set for your machine, the env file shouldn't need editing in the future, in which case you can protect the env file
Multiple printers
If you need to create files for multiple printers where content is largely the same, instead of exiting nano after creating the first file
- edit the file for the second printer
- press
ctrl+oto save - do NOT press
Enter, edit the output/save name then pressEnter - repeat as many times as needed, and exit with
ctrl+xafter the last machine
Bind to an account
Start your connector in interactive mode
Note
p1s is the file name of the env file, if you named it p1s-garage.env, it would be p1s-garage instead of p1s
in termux you'll see a QR code and a code on the side. in your web browser, navigate to https://octoeverywhere.com/code to enter and bind the connector to your account (or scan the QR code)
compression pip install failed
the first time you run each connector, you might get a long "error" message after the QR code, simply scroll up to see the binding code. The message will read something like:
compression pip install failed. /data/data/com.termux/files/home/octoeverywhere-android/venvbin/python3 zstandard>=0.21.0,<0.23.0.....installing build dependencied:started Installing build dependencies: finished with status error..... installing build dependencies for zstandard did not run successfully.....building wheels for collected packaged:cffi finished with status error...did not run successfully...SetuptoolsDeprecationWarning:License classifiers are deprecated....
Once the bind is complete, exit the by pressing ctrl+c twice
Repeat this binding process for every .env file
Creating persistent Termux services
run deactivate to ensure you've exited the virtual environment
create service directories
each machine/env file will need one service, in the commands below oe-p1s can be named anything you want, as long as it's unique per device. if you have multiple devices, you can repeat these commands by using up arrow and changing the name each time.
Creating the service
in the script below p1s has to be the name of the .env file the service is for, if your .env file is name p1s-1.env it'll be p1s-1
#!/data/data/com.termux/files/usr/bin/bash
exec 2>&1
exec /data/data/com.termux/files/home/octoeverywhere-android/run-connector p1s
ctrl+o,Enter,ctrl+x
each run script needs to be executable
Configure logging
Starting the services
if you need to pause/restart the service in the future, like when updating access code for bambu machines
if you simply wish to refresh/restart the service, use sv restart oe-p1s
If you decided to remove a machine/remove the service
Automatically start Termux on boot
Install Termux:Boot from the same source you installed Termux
- Github: https://github.com/termux/termux-boot/releases/latest
- F-Droid: https://f-droid.org/en/packages/com.termux.boot
launch Termux:Boot, then switch back to Termux
#!/data/data/com.termux/files/usr/bin/sh
termux-wake-lock
. /data/data/com.termux/files/usr/etc/profile.d/start-services.sh
The third line starts with a period . followed by a space.
ctrl+o, Enter, ctrl+x
make the boot script executable
restart the phone and the services should run automatically after reboot and unlock (termux cannot run after a reboot if the phone hasn't been unlocked yet)
Both Termux and Termux:Boot should have their battery optimization set to unrestricted, and added to never sleeping apps list
Adding printers in the future
Once everything is configured and working, it's easy to add new printers in the future
If you're using service manager, it also needs to be updated.
add or remove the printers in services
Updating OctoEverywhere
If there's any updates to OE in the future, we can simply do a pull
cd "$HOME/octoeverywhere-android/src"
git fetch
# If fetch doesn't show any changes, no need to update
git pull --rebase
if there's any merge conflicts abort the pull git rebase --abort, OE made significant changes that may not be compatible
after the pull, update the dependencies:
"$HOME/octoeverywhere-android/venv/bin/python3" -m pip install --no-cache-dir -r "$HOME/octoeverywhere-android/src/requirements.txt"
Compiling Zstandard
Zstandard offers better compression than the fallback zlib.
Termux uses a newer version of python, which requires a newer version of Zstandard, octoeverywhere explicitly wants 0.21.0~0.23.0, but 0.25.0 will actually work too.
Since Zstandard doesn't have a package for Android/Termux, we have to compile it ourselves.
Note
Ensure all connectors are down before compiling and installing Zstandard
sv down oe-p1s
pkg install clang make pkg-config libffi zstd
CFLAGS="-I$PREFIX/include" LDFLAGS="-L$PREFIX/lib" "$HOME/octoeverywhere-android/venv/bin/python3" -m pip install --no-cache-dir "zstandard==0.25.0"
After zstandard is compiled and installed, connectors can be resumed and checked to ensure zstandard is being used
You should see Compression is using zstandard
Service manager (QOL)
if you have multiple printers and would like to be able to down/up/restart or check the status of them with a single command, we can create a simple script
create the manager:
#!/data/data/com.termux/files/usr/bin/bash
services=(
    oe-p1s-1
    oe-p1s-2
)
case "${1:-}" in
up|down|restart|status)
sv "$1" "${services[@]}"
;;
*)
echo "Usage: $0 {up|down|restart|status}"
exit 1
;;
esac
save and exit
ctrl+o,Enter,ctrl+x
make executable
Usage:
"$HOME/octoeverywhere-android/oe-all" down
"$HOME/octoeverywhere-android/oe-all" up
"$HOME/octoeverywhere-android/oe-all" restart
"$HOME/octoeverywhere-android/oe-all" status
SSH Access (QOL)
Typing on the phone can be quite slow, especially since you'd have to type quite a bit of scripts, having SSH access allows you to copy and paste to minimize the chance of typos.
pkg install openssh
passwd          # Create a password for your session
whoami          # Get your username (e.g., u0_a123)
sshd            # Start the SSH daemon
Note
When typing the password, it won't display on screen.
To stop the ssh you can run pkill sshd
To connect, run the following to connect